Apple devices allow local configurator connection with enrolment with InTune

Connecting a device to a computer post InTune MDM enrolment can be challenging due to the necessity of an Apple Configurator certificate. However, obtaining and configuring this certificate isn’t always straightforward.

Unfortunately this must be completed before enrolment, if there is need to manage a device post-enrolment. The user will need to have iCloud storage to perform a backup and restore after a reset. The actual need for this is subjective. However if you are a IT department creating backups locally has a great advantage for user support. As does being able to install ad-hoc profiles or updating the device. The latter two could always be done with the MDM.

Contrary to some online suggestions, this isn’t a push certificate from Apple. The actual process involves:

  1. Procuring the Apple Configurator certificate.
  2. Exporting and configuring it to match InTune’s specific requirements for seamless device connectivity with a computer.

Understanding this precise procedure is essential for successful integration with InTune MDM, ensuring a smooth experience for managing devices.

Choose Login, then the certificates tab, and Choose the certificate labelled Apple Configurator.

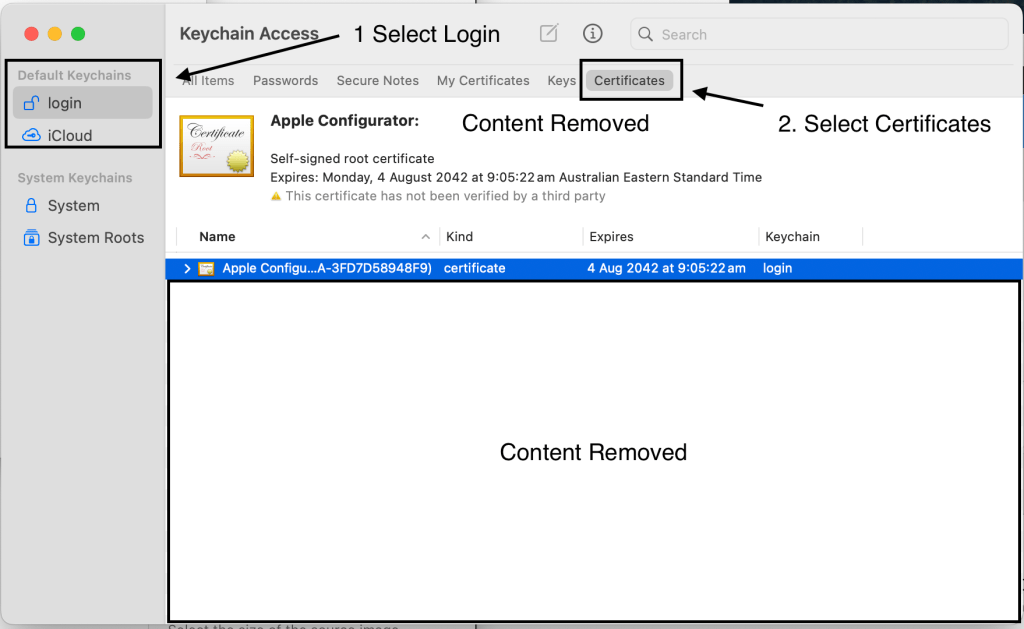
If you do not see a certificate for Apple Configurator. Ensure you have imported or signed into your organisation through Apple Configurator.

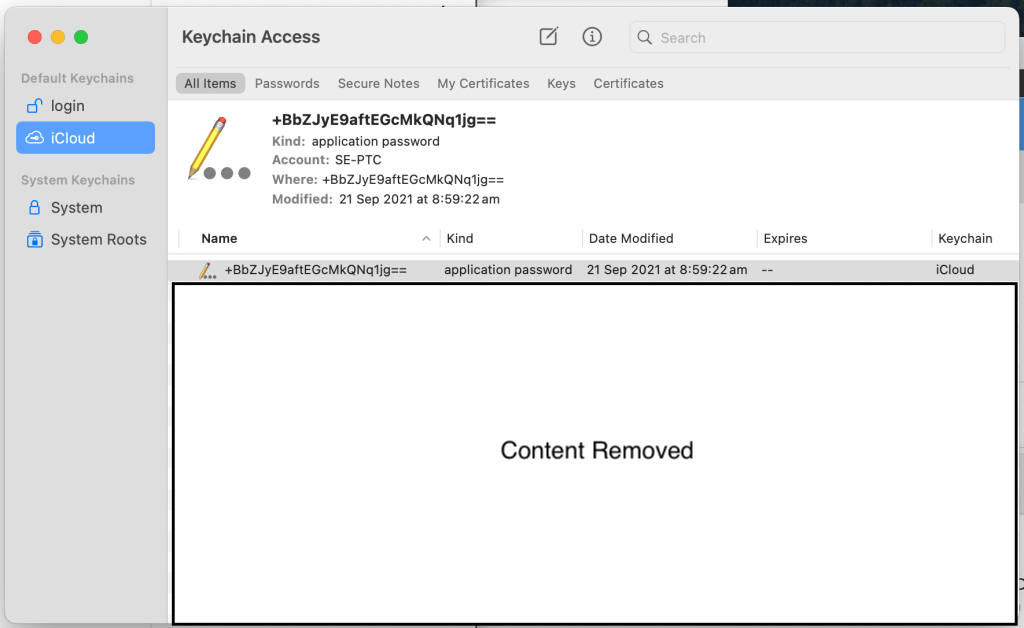
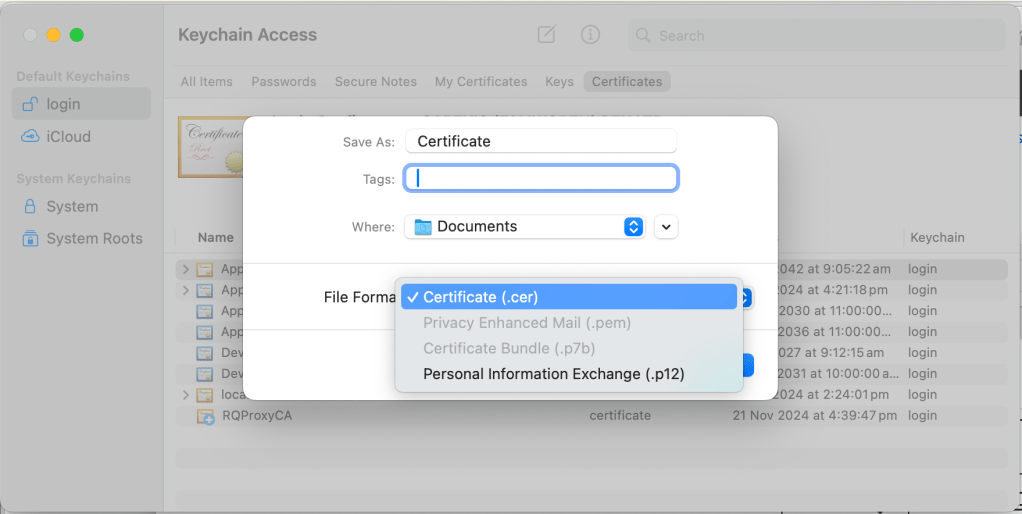
Click File / Export Items

Choose a filename and path and change the file format to Certificate (.cer)

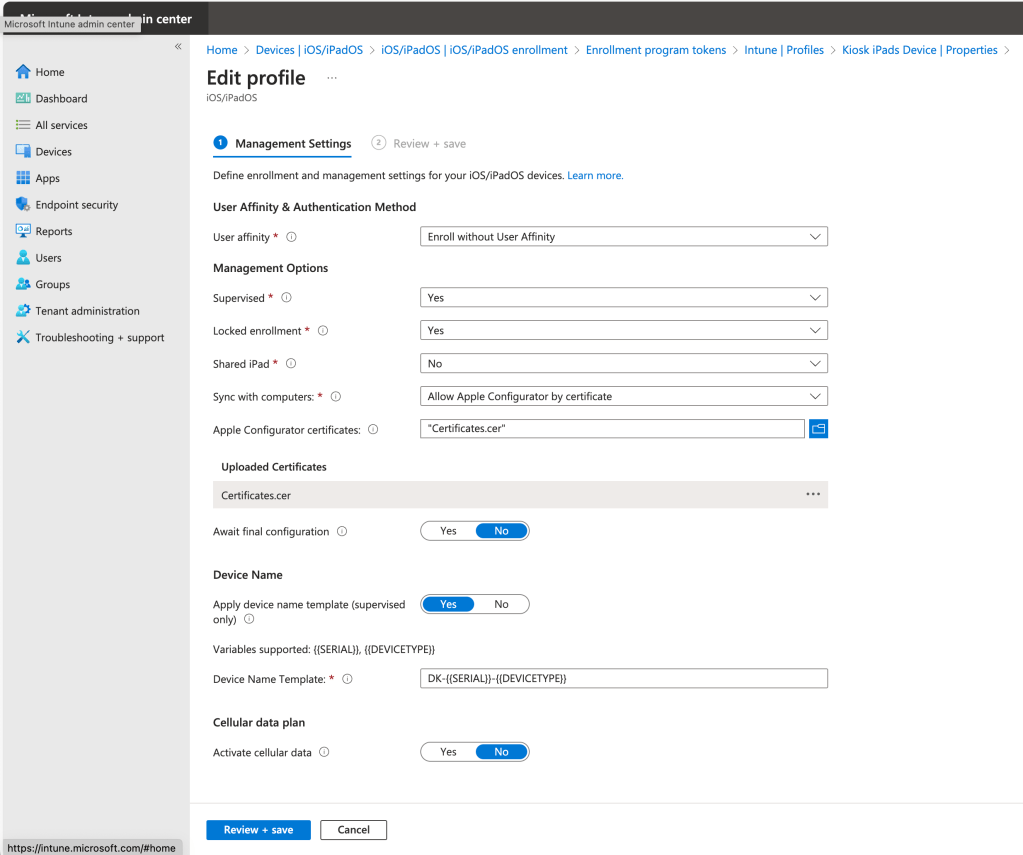
Open Intune and navigate to

Devices | iOS/iPadOS | Enrolment | Enrolment Program Tokens | Profiles | Profile Name

Choose Sync With Computers: Allow Apple Configurator by Certificate

Choose the certificate file that you have exported and save

Any newly enrolled devices from this point onwards, will be allowed to connect to Apple Configurator with your management computer. If you want to use it on another PC, importing the organisation should be enough.

The Parliament App

Greetings, everyone,

I’m thrilled to introduce The Parliament, the maiden app developed and launched by thing.net.au, now available on the App Store.

This dynamic video streaming application brings live sessions from the Australian Parliament House straight to your fingertips. Seamless access to three primary streams—the House of Representatives, the Senate, and the Federation Chamber—is just the beginning.

The app opens doors to an extensive collection of video content. From the proceedings of house and senate committees to captivating press conferences and a variety of special events, it offers a comprehensive view. Notably, its historical archive is a treasure trove, encompassing recordings from these Chambers across different occasions.

With a powerful search function, users can easily explore videos by their indexed titles. Additionally, the app smartly saves your progress, allowing seamless resumption of videos. Standard features like Picture in Picture and Airplay are seamlessly integrated for enhanced user experience.

The app is compatible with iPhones, iPads, and Apple Silicon computers. An Apple TV version is in the final stages of certification and will soon join the lineup.

Regardless of your interest in parliamentary affairs, I invite you to explore the app. The development journey has been immensely gratifying, and I eagerly anticipate your suggestions for bug fixes, improvements, feature ideas, or reviews.

Thank you for considering The Parliament app!

Lessons learned deploying Microsoft Tunnel Gateway

Over the last couple of days I have successfully deployed Microsoft Tunnel Gateway. Using the newer Microsoft Defender app on iOS. There are a few lessons learned here, which you won’t find in the documentation.

  1. The “Supported Operating Systems” list is accurate, when you remove all the deprecations.
    The only two supported routes is CentOS and Redhat Enterprise. Don’t get bogged down with the wrong distribution. Also dedicate a VM to this role.
  2. You will need to define a route to the server running Tunnel Gateway.
    Defining a route to the server running the Tunnel Gateway is essential for seamless functionality. Without this route, clients may connect, but their data will go nowhere. The data will reach your servers, but the responses won’t make it back to the clients. To ensure a smooth and two-way communication flow, it is crucial to set up the appropriate routes for the Tunnel Gateway server. This way, your clients can establish a successful connection and receive responses effectively, guaranteeing a reliable and efficient user experience.
  3. When designating an internal host to check for the health portal, it is recommended to use HTTP for simplicity.
    Opting for HTTPS would require the addition of some root certificates to the deployment, particularly if the SSL is signed by an internal CA. However, it’s important to note that handling SSL certificates signed by an internal CA is beyond the scope of the documentation.
    To streamline the process and avoid complications, consider using HTTP for the health portal setup. This decision ensures smoother implementation and avoids the complexities associated with managing SSL certificates from an internal CA.
  4. Your clients connect you WILL get traffic flow, but right after the tunnel will drop.
    When your clients connect, traffic flow is established, but you may encounter a situation where the tunnel drops immediately after connection. This issue is often caused by a conflict between the internal network range specified in the server configurations panel and the server hosting the tunnel gateway’s internal docker BEP (Backend Pool) range.
    To resolve this problem, ensure that the internal network range specified in the server configurations panel does not overlap or conflict with the server hosting the tunnel gateway’s internal docker BEP range. By addressing this issue, you can maintain a stable and uninterrupted tunnel connection, providing a seamless experience for your clients.
  5. Trust the only port required is what you have specified in the server configurations panel.
    The only port required for the Microsoft Tunnel Gateway is the one you have specified in the “Server Configurations” panel in the portal. The documentation previously mentioned 443/tcp and 443/udp, but please note that UDP has been deprecated since the retirement of the Microsoft Tunnel app.
    To ensure proper functionality, make sure your outbound firewall has port 443 opened to allow communication with various Microsoft resources.
  6. How do I use this as a per app vpn. I can only seem to get Safari to work?
    To configure an app to use the tunnel, go into your iOS app list and select the app you want to send via the tunnel gateway. The configuration property is in Assignments; simply choose the VPN profile that has been created in the device configuration.
  7. Certificate Requirements, So you need a certificate, but there are many different combinations of attributes. So you can cheat here is the info.
openssl.cnf

[req]
req_extensions = v3_req
default_bits = 2048
encrypt_key = no
default_md = sha256
prompt = no
utf8 = yes
distinguished_name     = req_distinguished_name

[req_distinguished_name]
countryName = [Country]
stateOrProvinceName = [State]
localityName = [City]
organizationName = [Organisation]
commonName = [External.DNS.Name]


[v3_req]
subjectAltName = @alt_names

[alt_names]
DNS.1 = [Internal.DNS.Name]
DNS.2 = [External.DNS.Name]


sudo openssl req -new -newkey rsa:2048 -nodes -keyout server.key -out server.csr -config openssl.cnf

Send your server.csr to your windows PC and run

certreq -submit -attrib "CertificateTemplate:WebServer" server.csr

Follow the process to receive the certificate. Once you have the server.crt you need to append a base64 version of the full certificate chain to the file. Send it back to the Tunnel Gateway server and place the certificate and private key in the filesystem as defined in the documentation. Your file will need to look like the below example.

-----BEGIN CERTIFICATE-----
MIIHOzCCBSOgAwIBAgITTAAAAYgTOK4pNtgKAQAAAAABiDANBgkqhkiG9w0BAQsF
ADB/MRIwEAYKCZImiZPVLGQBGRYCYXUxEzARBgoJkiaJk/IsZAEZFgNjb20xFjAU
BgoJkiaJk/IsZAEZzzzXJlezzzBgoJkiaJk/IsZAEZFzzzpY2UxJDAikkshwuduq
...
2M4+WpuQMRE2SYEwr2iYb4s46vbL96ale+6qlUHE2zdCOs6eVf/XG4qZcWB8RPzB
bTndZRFJ2B3htcgPmXSd7peFrTZsqIFyCU2zKuoIMSYV096zryM5Tecy28dOhJ7H
jgJFZQWR+SwXz9g8zWWkn6jvsxY5NysvpZ+53Sjdbw==
-----END CERTIFICATE-----

-----BEGIN CERTIFICATE-----
MIIF8zCCA9ugAwIBAgIQcLNdGlZ0e6BJCkAvoQjm0jANBgkqhkiG9w0BAQsFADB/
MRIwEAYKCZImiZPyLGQBGRYCYXUxEzARBgoJkiaJk/IsZzzzgNjb20xzzzAUBgoJ
kiaJk/IszzzFgZjYXJleXMxzzzoJkiaJk/IsZAEZFgzzzzz2UxJDAiBgNVw82hsj
...
VgtrSxckbpAGnlMs5Pq6bMpzpBwIp+oB6F2y1/f2fhrbbV6oDH9ruDfq+N884Tbk
2JR8S7UAN3cxbs7Z9YS+8xfqMmcnqN62otV5xalFmbiegES0+/FeOluFFexPyEds
/AdwDnf3kCMrx+i+BJQOEgJ+LEStAjJtgwu3dKhjMlUVCXkb3gca
-----END CERTIFICATE-----

Hopefully these ramblings make sense,

Ubiquiti UCK-G2 Plus Stuck on Getting Ready

In todays problem I have had a UCK-G2 auto update. It had gotten itself stuck on “Getting Ready”. This caused the network app was unresponsive.

So the basic steps I used to get the device back on track. Open the settings page, Enable SSH and get the LAN IP.

Connect to the UCK through SSH ssh root@[uck ip] with the password defined in the admin console.

ls /usr/lib/unifi/data/backup and take note of the latest version .unf there. 6.2.26.unf will be used in the example. once you have the filename SCP the backup out to your computer. You might choose to download more then one.

scp root@[uck ip]:/usr/lib/unifi/data/backup/6.2.26.unf 6.2.26.unf

run, and install :-
apt remove --purge mongodb-server
apt remove --purge unifi
ubnt-systool fwupdate https://fw-download.ubnt.com/data/unifi-cloudkey/1e1e-UCKP-2.0.24-567c9e3a53a2449db186ba14af0abf0d.bin

When the device reboots SSH back in and run.
ubnt-systool reset2defaults

Once the device is back (again) https to it and configure it for the cloud. It will do its update again to the latest version. Network might take 5-10 minutes to come online, once its up and running with the default configuration. Upload the backup you downloaded at the beginning.

Because the device uses ‘overlayfs’. If the device gets the already installed version uploaded again. it does not seem to trigger a filesystem rebuild. No matter how many times you uninstall and reinstall UniFi and MongoDB. There will always be a ‘stats db’ present and it forces the database to be perpetually re initialized. Installing a previous version will downgrade the device. but running factory defaults Seems to reinitialize the diff filesystem and gets it going again from a known point.


Core I9 11900K-F CLOCK_WATCHDOG_TIMEOUT

Had two 11th Generation Intel CPU’s come past my desk in the last week. One was a Z490 and the other a Z590. Both were Gigabyte Aorus Boards. CLOCK_WATCHDOG_TIMEOUT seems to be reproducible with nearly every execution of UserBenchmark.

When running UserBenchmark they both would get to Core 2 of the CPU tests, freeze and throw this error. Once I had them throw a WHEA_UNCORRECTABLE_ERROR. That time the faulting module was GenuineIntel.sys.

Anyway, in BIOS under the CPU optimisations disabling “Adaptive Speed Boost” corrects this error. There must be a issue with how GigaByte has implemented this function. There is not much info around the internet about CLOCK_WATCHDOG_TIMEOUT, the general push seems to be to install some sort of device driver scam ware.

MYOB API 0x80070643 – fatal error during installation

Ive been having issues with the MYOB API on Premier 2021 Server Edition.

Ever since 2021.2 I have been unable to upgrade the MYOB API service with the server installer. The API installer would ask the location, and whether to self sign the certificate that protects the API endpoint. Uninstalling the API service will also appear to proceed then fails.

As far as the install logging goes, none of it was helpful. And the MYOB help focuses solely on .NET 4.5 and updates.

To fix this issue. you will need a certificate bundle in PFX format. I did not have to enter the password for the bundle at all. Which is a indication the software does not attempt to install it.

A PFX bundle has to contain a public and private key. These are used to secure the API endpoint from an adversary using a packet sniffer. PFX bundles from unknown sources should always be considered dangerous, and should never be imported to your certificate store.

With the PFX bundle in the filesystem of your server, open the API installation wizard, found in “C:\Program Files (x86)\MYOB\AccountRight\API_Installer”. When the installer asks whether to use a self signed, or user provided certificate. Choose user provided and select the certificate bundle filename. When the installer fails, you will be able to uninstall the MYOB API application with add/remove programs. Once the MYOB API is completely removed. When you rerun the installer from the location above. This time choose self-signed and the latest API service should install correctly.

Update for 2022.1

The MYOB Api Service Must be stopped in the Services Controller.
‘Services.msc’

Outlook 365 Email View Problems

This morning my users woke up to Office 365 had updated. One of these updates seems to cripple Outlook 365. The issue that has been observed is that when you open an email the body either blank, or shows a single line. depending on the size of the window.

To roll back to a previous version, using InTune management login to https://manage.microsoft.com/ and open the App deployment policy for your Office 365 suite.

Set
Remove other versions to Yes,
Version to install to Specific,
Specific Version to 2103-13901.20400

Click Review and Save.

Any clients that were deployed with InTune will reinstall office once all the apps have been closed.

A client wont downgrade while office apps are open. To force a downgrade ask the users to ‘sync’ in Settings\Accounts\Access Work or School, Select the configured work location and click Info then Sync.

Trigger a Sync remotely, but unless the office apps are closed the downgrade may not complete immediately.

After the downgrade users will see a splash screen that says, please wait while we update office.

A user can after the InTune sync elect to downgrade office with the Update Now button, which will deploy the administrators chosen update.

Hope this helps someone,

Scobber

How to get your Kindle DX working in 2021

The Kindle DX is very much a legacy device. Amazon don’t have much information on it available online. Most of the software update and help guides no longer exist. I also found plenty of resources on identifying your kindle, but there were no downloads available.

So the Kindle DX, it has no wifi, but has the world-wide 3G network (whisper net). The problem is that the Root Certificates in the device have expired. So there is no SSL, which means no Registration/Deregistration. The Kindle store is browsable, I think its because the site is HTTP. but HTTPS for downloads.

Back to getting your Kindle working. There are a few guides out there, but no links to downloads. the download I found on a 3rd party site was not for my DX.

Full Download Page for ALL models
https://www.amazon.com/gp/help/customer/display.html?nodeId=GKMQC26VQQMM8XSW

Kindle DX (2nd Generation)

  • 2.5.8

OK. to get your serial open settings, Home -> Menu -> Settings
Under device info you will find your serial number. The current software version of your Kindle will be at the bottom.

  1. Check your Software version
    • If your software version is not 2.5.8. Download the “Download this file” link corresponding to your Kindle serial number. If you are already on this version, goto step 2.
    • Using the USB on your computer. Copy it to the ‘root’ of the Kindle’s USB disk.
    • While still in the settings page, press menu then Update Kindle.
  2. Update the Kindle Services
    • If your software version is not 2.5.8. Download the “Kindle Services Update” link corresponding to your serial number.
    • Using the USB on your computer. Copy it to the ‘root’ of the Kindle’s USB disk.
    • While still in the settings page, press menu then Update Kindle.

If for any reason the Kindle ‘disconnects’ from your computer while copying the updates on, try another computer or cable. and if ‘update this kindle’ does not appear active in the menu, choose restart instead. The Kindle usually triggers all available updates on reboot.

If the kindle was not unregistered correctly before a factory reset it will come to life with the previous account. you can at this point unregister and reregister.

Windows 10 Power Policy Settings not functioning after update

Windows 10 power policies have some strange behaviours when applied over time. Negative issues seem to arise between SCCM, GPOL, and MDM deployments. Then the issues are exasperated by Windows Update when Windows 10 performs a major update. I have also heard of home users losing control of their power sleep settings.

In the work environment when some computers are upgraded from Windows 10 1809 to 1909 – 2004 using windows update, or the update assistant. The strange power related settings happened when they became MDM aware. Our power policy here is 5 minutes screen off, 10 minutes sleep when on battery. Then 60 minutes screen off and 65 minutes sleep when on AC. This is because of the needs of the organisation. All our computers are mobile and we do not want to have a machine on in a bag to cook itself.

In our domain it has been through all the various architectures, from way back when NT 4.0 was new. It was upgraded all the way through to Windows Server 2016. Hybrid joined to Office 365 and Azure AD.

All the power settings have been unlinked from Group Policy, and are only provided via Intune. Through a ORM-URI custom policy. But for some computers, not all. The AC sleep is 7 minutes 30 seconds. Even though the user dashboards appear to display the correct timeouts. If the computer is completely reset using a base Windows 10 1909 or 2004 build. Then Joined to the domain and enrolled in MDM all the power settings function as expected.

All the different user dashboards. Whether in control panel, or the new settings menu, registry, InTune or Group Policy have no effect when changing the windows power policy. The settings dashboards appear to display the chosen timeout. but in practice the computer is stuck to sleeping between one to seven minutes. The only solution which works persistently appears to be a reinstall of Windows.